Adding “Creative Confidence” to your beginner progressions 

by Mike Ma

How are your beginner progressions? Got them on lock? I bet you have a series of tasks and drills that you can recite in your sleep. But let me ask you, how many of them allow your guests to be creative?

Creativity is not just for just musicians, artists, and dancers, but includes businesswomen, doctors, firefighters, stay-at-home dads and everyone in between – including your beginning guests.

A leader in teaching creativity comes from the Stanford Design School, where I have been for the last 8 weeks immersing myself in a concept called “design thinking.”

Design thinking is a creative process that has led to some of the development of many of the most innovative products you use today, ranging from the Apple mouse, OXO kitchen tools, to solving many world problems like portable light and incubating premature babies in impoverished countries.

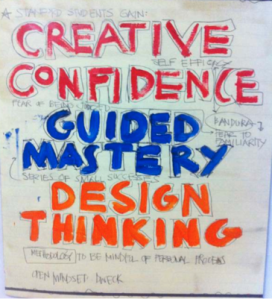
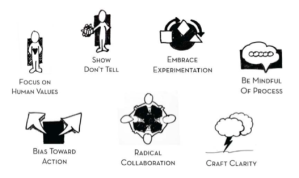
During the first session at Stanford, our faculty put up these two slides up to explain what design thinking is and how we are going to be practicing it.

dschool1 dschool2

courtesy: Stanford d.school (FYI – that’s Guided Mastery, not Mystery)

What if we applied these ideas to what we do on snow?

The typical development of skiers and riders saves “creative” tasks like freestyle for intermediate to upper-level lessons. There is a belief of most of the public and many instructors that our guest athletes have to “learn the basics” before they can explore creativity.

As experienced pros, can we challenge that? Instead of only teaching tasks in a progression, can we teach creativity starting a beginner? Can we have guests using their equipment as creative tools from the first minute on snow?

Here are a couple thought starters that might work on any equipment that I’ve been experimenting with in different lessons this season. These are just suggestions that you may play with, steal, debate, or expand and create your own.

Standard Progression Creative Progression Suggestions
Static Stance Drills / Straight Glides Photo Shoot – Have your athlete or group pick a pose while standing on their equipment as if you are posing for a magazine photo – get them to “own their stance.” Ask them about why they picked that stance and have the group try different poses (could be a nice icebreaker too!).

Pending your guest and terrain assessment, encourage them be as creative as safely possible:

·      Want to tail press? Awesome!

·      Want to be out of the bindings? OK, show me.

·      Best friends want to do a “back to back” pose? Let’s give it a try.

Let them try moving in their stance in a straight glide. Let them try different stances or “steal” someone else’s stance.   These provide great coaching opportunities for you to provide positive feedback that is supportive of an athletic stance.

Skating / Fade Turn Spelling Bee – Once you’ve taught some static edging movements on flat snow, ask them to write a few letters or numbers in the snow using gentle edge pressure while skating (could be their initials, favorite color, their grade level, etc.) You could pair the group up, and see if the partner can follow along and guess the letters.

Be sure to coach how different characters will require edge changes (like a Z) and be sure to note the movements in the ankles and knees that are successful.

Side slipping / Linking turns Chalkboard – Pair up the group. One plays “the student” and the other is “the professor.”   The student is downhill while the professor is uphill.   For a slide slip drill, the professor calls out a number and that is the number of “hash marks” the student has to make in the snow while side slipping.     The professor comes down next using gentle edge pressure to “erase the chalkboard” by replace the hash marks with smooth snow. Have them switch roles as appropriate.

After introducing linking turns, this game can be used again. The student links turns, while the other professor has to erase the student’s turn artwork. Be sure to have the switch edges in their sideslips for balance.

Varying turn shape Beat Box – Have one of your guests make a beat using their lap as a bass drum and a clap as the snare (for instance, Lap … clap … lap, lap clap!). See if they can make “turns to the beat” using varying shapes and speeds. You can insert your own beat if the group is becomes too uniform.

Lastly, see if you can have the group do a “remix” or a “mashup” from different members’ beats to see what new shapes they can make from those new sounds.

What these drills share is not that they are games per se, but rather each encourages our guests to view their gear as a creative instrument, just like a paintbrush, a guitar, or a pair of ballet shoes.

Note well, these ideas are most effective in the hands of a seasoned instructor. These concepts are not likely for the newbies who have yet to understand the bread and butter mechanics that come with experience and repetition.

However, I’d wager the sooner that we can get our guests to unleash their creative energy into their skiing and riding, the more likely we can create a love of the sport for life.   Being someone’s creative coach may be a great way to rethink our jobs on snow.

If you are interested in getting more inspiration from design thinking and creative confidence, Stanford gives them away free at dschool.stanford.edu
Wrapping up the season

Thank you all for an amazing season — as we trade boots for flipflops, beers for margaritas (at least I am !), I wanted to make a couple suggestions to “wrap up” this season.

  • Send a thank you to any guest who left you a review – Build a relationship with your guest.   Write them a nice thank you note saying how much you enjoyed riding/skiing with them and let them know what you are up to next season.  You can see them on your profile http://shredbetter.com/auth/login/
  • Better yet, send them a progress card so they have something to remember you by (on your profile page)
  • Update your certs if you got some new bling or a new accreditation this year (Children’s Specialist, Freestyle, etc.)
  • Check out our new video “app” (it’s in beta!) – it’s more of a movement analysis tool that works with anything you’ve uploaded to YouTube and you want to send it to a friend.  You don’t need to download anything – it’s light and we know it.  Let us know what you think – http://shredbetter.com/video/create/

Thanks again! Drop us a line if you have ideas of how we can make next season even better. 

Explaining Skiing and Riding Levels 1-9

In the last post about the new progress cards that are on ShredBetter, we use levels 1-9 to describe abilities.

These aren’t the be-all, end all definitive “grade” that you get but rather it’s a framework to see what you’ve done and what you can do next.

Here is a short list of what each level summarizes:

Level 1 – First time experience / “Never ever”

2 – Can traverse or wedge to stop on beginner hill

3 – Turn both directions to a stop on beginner hill

4 – Can explore green terrain beyond beginner

5 – Ski/Ride blues with confidence

6 – Ski/Ride black trails with confidence

7 – Developing dynamic skiing/riding on advanced terrain

8 – Blending multiple dynamic movements on advanced terrain

9 – All mountain expert

Our progress cards have skills that represent abilities at each level.  A detail of each is below here for each discipline of skiing and snowboarding.  It’s long, but it gives you an idea of what you may be working on with your instructor.

We’ve decided to keep it simple and say “Can do it” or “Working on it” as a way to assess each skill.  No need for grades or numbers, just a friendly reminder from your instructor as to where she thinks you are.

———–

SKIING

Level 1

  • Put on/take off equipment and complete flat terrain activities
  • Demonstrate side stepping and movement patterns from foot to foot
  • Learn to get up independently after a fall
  • Glide in a straight run and use counter slope to stop
  • Glide with varying wedge size
  • Safely ride the Magic Carpet

Level 2

  • Develop balance and mobility, skating and herring bone
  • Comfortable gliding in a wedge and adjusting wedge size to stop
  • Demonstrate slight direction changes through turns in a gliding wedge
  • Turn out of the fall line to a stop in both directions (J turn)
  • Control speed by starting to link turns in both directions
  • Demonstrate edge control movements

Level 3

  • Safely ride a chair lift
  • Control speed and direction through linked turns
  • Match skis between turns
  • Demonstrate varying turn sizes and shapes
  • Skid skis slightly at the end of the turn in both directions

Level 4

  • Ski beyond the beginner chair lift
  • Balance on outside ski while completing a turn in both directions
  • Steer inside foot to match skis at end of turn
  • Manage speed through skidded turns on varying green pitches
  • Control speed through varying turn size and shape on green runs
  • Consistently ski in a parallel stance after the fall line

Level 5

  • Demonstrate proper pole position and usage
  • Consistently hockey stop in both directions
  • Perform skidded and carved turns in both directions
  • Comfortable linking turns in control on gentle blue terrain
  • Consistently ski in a parallel stance slightly before and across the fall line

Level 6

  • Demonstrate dynamic movements to match more difficult blue terrain
  • Balance and turn on one ski (outside ski to outside ski)
  • Consistently use poles for timing and rhythm
  • Blend dynamic turns and tipping movements into skiing
  • Ski easy bumps in control
  • Ski a groomed black run in control
  • Consistently ski in a parallel stance throughout the turn

Level 7

  • Demonstrate rail road track turns on green and blue groomed terrain
  • Confident in bumps on more difficult blue terrain
  • Ski groomed black runs in control with confidence
  • Blend technique and tactics to match terrain
  • Make short turns with upper and lower body separation

Level 8

  • Demonstrate dynamic turns on steep terrain with confidence
  • Confident in bumps and trees on more difficult blue/black terrain
  • Comfortable on off-piste terrain
  • Consistently perform hop turns on varying black terrain
  • Blend technique and tactics to match more difficult blue/black terrain

Level 9

  • Demonstrate big mountain safety
  • Identify and ski different lines in variable conditions, powder and crud
  • Blend technique and tactics on all double black terrain
  • Consistently perform hop turns on all terrain


———————-

SNOWBOARDING

Level 1

  • Put on/take off equipment and complete flat terrain activities
  • Balance, climb and glide toe side and heel side
  • Stand up on your own toe side and heel side on flat ground
  • Safely ride a magic carpet
  • Consistently side slip, toe side and heel side, to a stop

Level 2

  • Traverse across the hill on toe side and heel side
  • Garland on toe side and heel side
  • J Turn to a balanced stop on toe side and heel side
  • C Turn to a balanced stop on toe side and heel side

Level 3

  • Link S turns to a balanced stop
  • Safely ride a chair lift
  • Control speed and direction
  • Confidently link multiple turns
  • Demonstrate varying turn sizes

Level 4

  • Ride beyond the beginner chair lift
  • Manage catwalks and flatter terrain
  • Perform Ollies and Nollies
  • Control speed through varying turn size and shape on green runs
  • Confident making turns on varying green pitches

Level 5

  • Manage speed through turn size on blue groomers
  • Demonstrate skidded turns
  • Perform basic switch turns
  • Demonstrate basic carved turns
  • Learn smart style and basic tricks on progression features

Level 6

  • Consistently make dynamic turns on groomed runs
  • Make short turns with upper and lower body separation
  • Ride a groomed black run in control
  • Ride trees
  • Ride powder and off-piste terrain
  • Ride easy bumps in control

Level 7

  • Ride groomed black runs in control with confidence
  • Demonstrate dynamic carved turns
  • Confident in bumps on more difficult blue terrain
  • Proficient pressing and sliding on boxes/rails
  • Proficient throwing 1’s (180 degrees) on small jumps
  • Proficient at changing edges on the walls of bigger half pipes

Level 8

  • Demonstrate dynamic turns on steep terrain with style
  • Confident carving and skidding switch turns on more difficult blue terrain
  • Confident in bumps and trees on more difficult blue/black terrain
  • Blend technique and tactics to match more difficult blue/black terrain
  • Pressing and board sliding various sizes, types, and shapes of rails
  • Proficient throwing 3’s (360 degrees) on small jumps
  • Airs at or above the lip of a bigger half pipe

Level 9

  • Demonstrate big mountain safety
  • Powder slashes forward and switch
  • Identify and ride different lines in variable conditions, powder and crud
  • Confident riding medium jump features with style


Progress Cards: End your lesson on a high note!

We have been busy at ShredBetter taking in your feedback from our recent feedback survey (thank you for all those who sent responses!).
One thing that instructors asked for was more interactivity to the site and try to add more value to guests and instructors.  So today, progress cards are now live. You can be send these to guests as you finish a lesson to help build a better bond between instructor and guest.
To check it out login to your profile page!  
This is in beta (be kind!), and we wanted to get it out before the weekend and we are excited to hear how it works for you.  Please send me any feedback, good or bad, about how its going for you.
Progress Card Instructions
Making a card is easy, and you can do it from your mobile device.
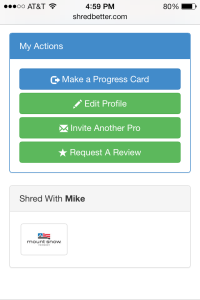
1. Be sure to be logged in to shredbetter.com, go to your profile page and click “Make a Progress Card” (tip: I keep my shredbetter URL, shredbetter.com/mike, bookmarked on my phone)
ShredBetter Progress Card Button

ShredBetter Progress Card Button

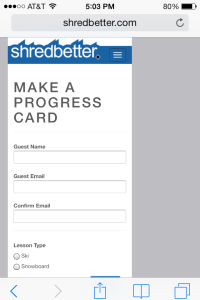
2.  Fill out some basic info about your guest
Progress Screen 1
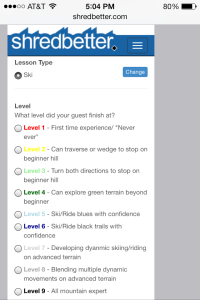
3.  Pick what level your guest is at using the Level 1-9 system.  We tried to put some guidance in for those who are not familiar with it.
Progress Screen 2
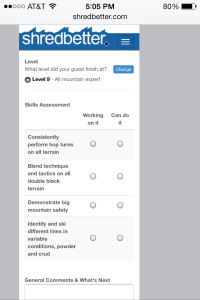
4.  Assess skills and give feedback on you think your guest has locked or is working on.  You don’t have to make a pick for every skill, just the ones you worked on and type some comments about overall observations, give practice tips, or preview your next lesson.
skill assessment
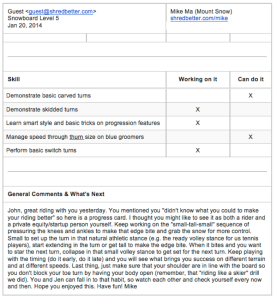
5.  Your guest will get an email card from you that looks like this
A sample progress card from ShredBetter

A sample progress card from ShredBetter

ENJOY! Let us know how it goes!

Underground Lessons Are Not a Good Time

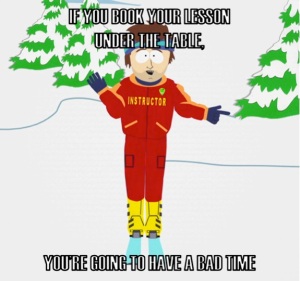
shredbetter badtime underground lesson

Underground ski and snowboard lessons are not worth it.

At ShredBetter, we are excited that instructors can directly market themselves. However, we do not, repeat do not, condone the idea that you should book a lesson with an instructor outside of their affiliated ski school.

In fact, if we discover that instructors are taking lessons off the books and using ShredBetter to facilitate that, that instructor will be banned permanently from the site.

I get the appeal.  To guests, you think you can save a few bucks.  And for the instructor, it might be exciting to take all of the fee a guest may give you rather than sharing it with the school.

Many of the arguments against these practices are outlined well in a piece in 32 Degrees (PSIA-AASI’s magazine for instructors), called Underground Teaching: You Don’t Want to Go There.  

There is a lot of industry fire and brimstone there that many instructors and guests will read about lost revenue for the resorts and jail time.  Here are my takes on the reasons that should appeal

1) Injury and Insurance —  If you’ve taught for any length of time, you have likely either had some experience or near-brush with injury.  Either you have been injured by a run away beginner on the bunny slope or worse, you have had a guest injured in your lesson.  If this happens during an off the book lesson, bad things can happen.  As an instructor, you are now personally liable.  As a guest, your only recourse is to sue the instructor.  Given the wages of most instructors, it can be unlikely you will ever collect even if you win a case.  It’s scary on both sides of the equation.

2) Mountain safety — An instructor’s jacket is a very effective beacon in keeping people away from you.  If he or she is off the books, they will likely be forced to wear their civilian gear.  This can be very important in building confidence, especially at beginner levels.

3) Lift lines — Off the books instructors can’t use the ski school line, which is a very nice benefit, especially during holidays and weekends.

Here are two more reasons that really just apply to instructors:

4) No teaching credit — For many instructors who are part-time, teaching off the books won’t help fulfilling your teaching requirement.  And that means less time for you to freeski or freeride.

5) Being banned from teaching — To some degree, this is the biggest one for me.  If you are caught, you are likely never to teach again, and likely not to teach anywhere near you are caught.  If you are like me, you love teaching.  I sometimes joke I would pay to do my job. You also likely love your mountain.  You have roots, friends, and community in the ski school.  To be torn from that would be a killer for me, and likely for you too. (If not, then I might question how much you really love teaching).

In sum, it isn’t worth it for instructors or guests to try and book lessons under the table.  Keep working with your school, and good things will happen.  Perhaps more importantly, bad things will be less likely to happen.  And who wants to have a bad time skiing?

How to Pick an Instructor

Getting a private lesson can be a big investment of time and resources.  Here are a couple tips about picking the best ski or snowboarding instructor for your lesson.

  • Do it early. Whether you use ShredBetter or just call the local reservation desk in advance, time is your friend.  The best instructors are often filled up many weeks, or months in advance with their regulars. During busy times (MLK weekend and President’s Week), ski schools are often sold out and have no one to sell.

  • Be clear about your goals.  Tell the reservation agent what you are looking for, or you can search here on ShredBetter and find instructors that you think match your desired outcome.  Total beginner and just want to have fun? Make your first set of good turns on blue terrain? Ride your first park feature? Clean up your steeps or bump technique? Have an honest goal in mind, and let the reservation agent and your instructor know when you meet him or her.

  • Ask about certifications.  The Professional Ski Instructors of America (PSIA) and the American Association of Snowboard Instructors (AASI) provide certifications for instructors at Level I, II and III.  Respectively, these instructors will be wearing a bronze, silver, or gold pin on their jacket, representing the levels. There is another post about certifications and what they mean in more depth, but after, I would ask for the highest certified instructor that is available.  This is a gross generalization, but if you get someone who is Level II or higher, I’d wager you are likely to have a very good time.

  • Years teaching matters …  I also would ask how many years someone has been teaching.  When you have been teaching a long while, you are likely to have encountered hundreds of different types of people, lessons, goals, snow conditions, etc.  Sometimes they don’t have national certifications, but there are wily, veterans at every mountain that are worth finding.

  • … But years skiing or riding rarely does.  I would not care about how long someone has been skiing.  As a staff trainer, I would tell you that there is a very little correlation to teaching ability to skiing/riding experience.

  • Think like a dater.  When people try dating sites, they are very specific, I am looking for a person ages x to y, dark hair, outgoing, etc.  While you don’t have to be that discriminatingly specific, the analogy makes the point to try and think hard about how you learn best.  Ski schools, especially the private desk, is a service business, so be as specific as you can about getting what you need.  Do you learn best through breaking things down analytically?  Are you more just a doer? Do you learn better with women teachers? Men? Are there age groups that you work better with?  The more honest thought you put into your successful situation, the more fun you are going to have.

Hopefully these few tips can make sure you get the most out of your private lesson and help ensure that you get matched with the best pro available.